Create packages for Xamarin with Visual Studio 2017 or 2019
A package for Xamarin contains code that uses native APIs on iOS, Android, and Windows, depending on the run-time operating system. Although this is straightforward to do, it's preferable to let developers consume the package from a PCL or .NET Standard libraries through a common API surface area.
In this walkthrough you use Visual Studio 2017 or 2019 to create a cross-platform NuGet package that can be used in mobile projects on iOS, Android, and Windows.
- Prerequisites
- Create the project structure and abstraction code
- Write your platform-specific code
- Create and update the .nuspec file
- Package the component
- Related topics
Prerequisites
- Visual Studio 2017 or 2019 with Universal Windows Platform (UWP) and Xamarin. Install the Community edition for free from visualstudio.com; you can use the Professional and Enterprise editions as well, of course. To include UWP and Xamarin tools, select a Custom install and check the appropriate options.
- NuGet CLI. Download the latest version of nuget.exe from nuget.org/downloads, saving it to a location of your choice. Then add that location to your PATH environment variable if it isn't already.
Note
nuget.exe is the CLI tool itself, not an installer, so be sure to save the downloaded file from your browser instead of running it.
Create the project structure and abstraction code
Download and run the Cross-Platform .NET Standard Plugin Templates extension for Visual Studio. These templates will make it easy to create the necessary project structure for this walkthrough.
In Visual Studio 2017, File > New > Project, search for
Plugin, select the Cross-Platform .NET Standard Library Plugin template, change the name to LoggingLibrary, and click OK.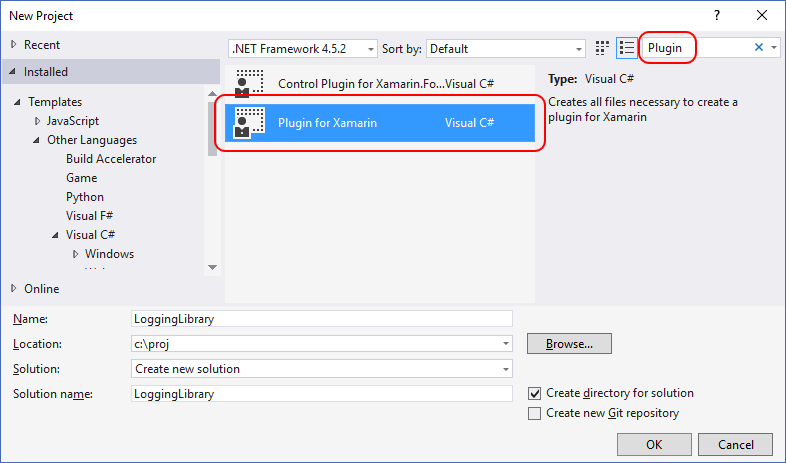
In Visual Studio 2019, File > New > Project, search for
Plugin, select the Cross-Platform .NET Standard Library Plugin template, and click Next.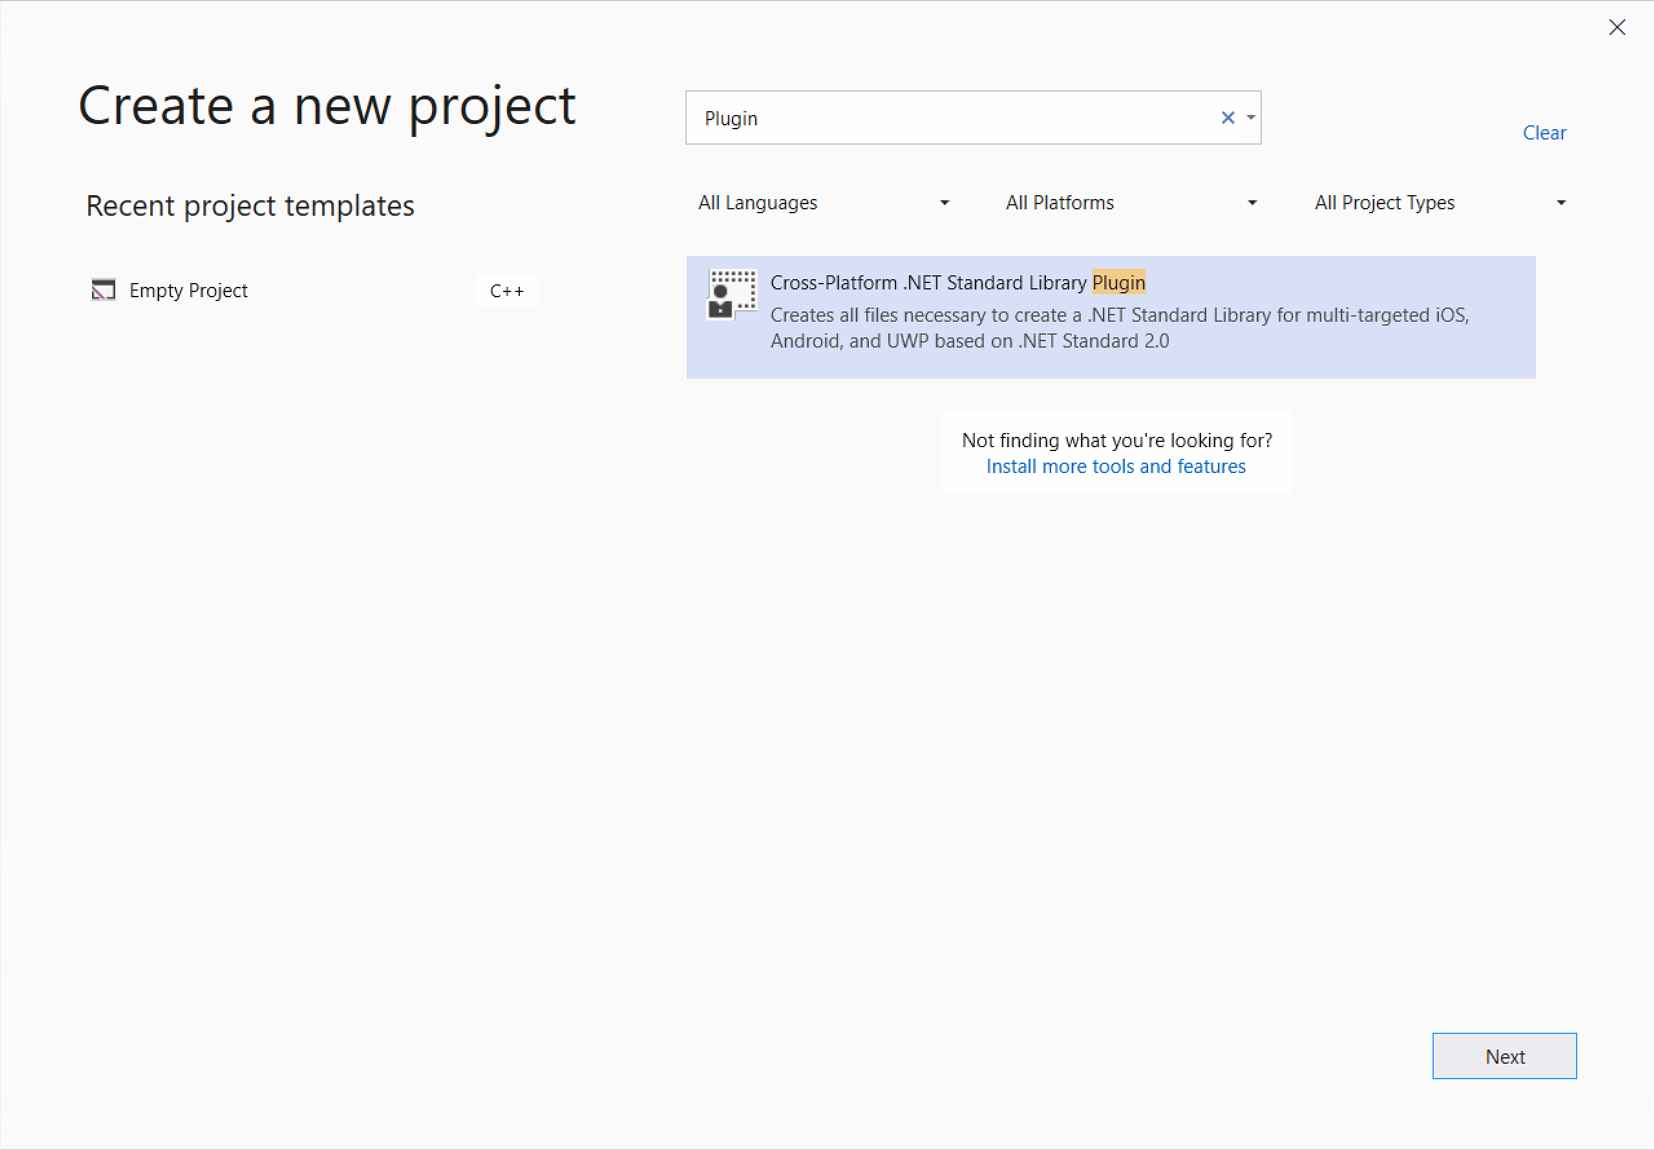
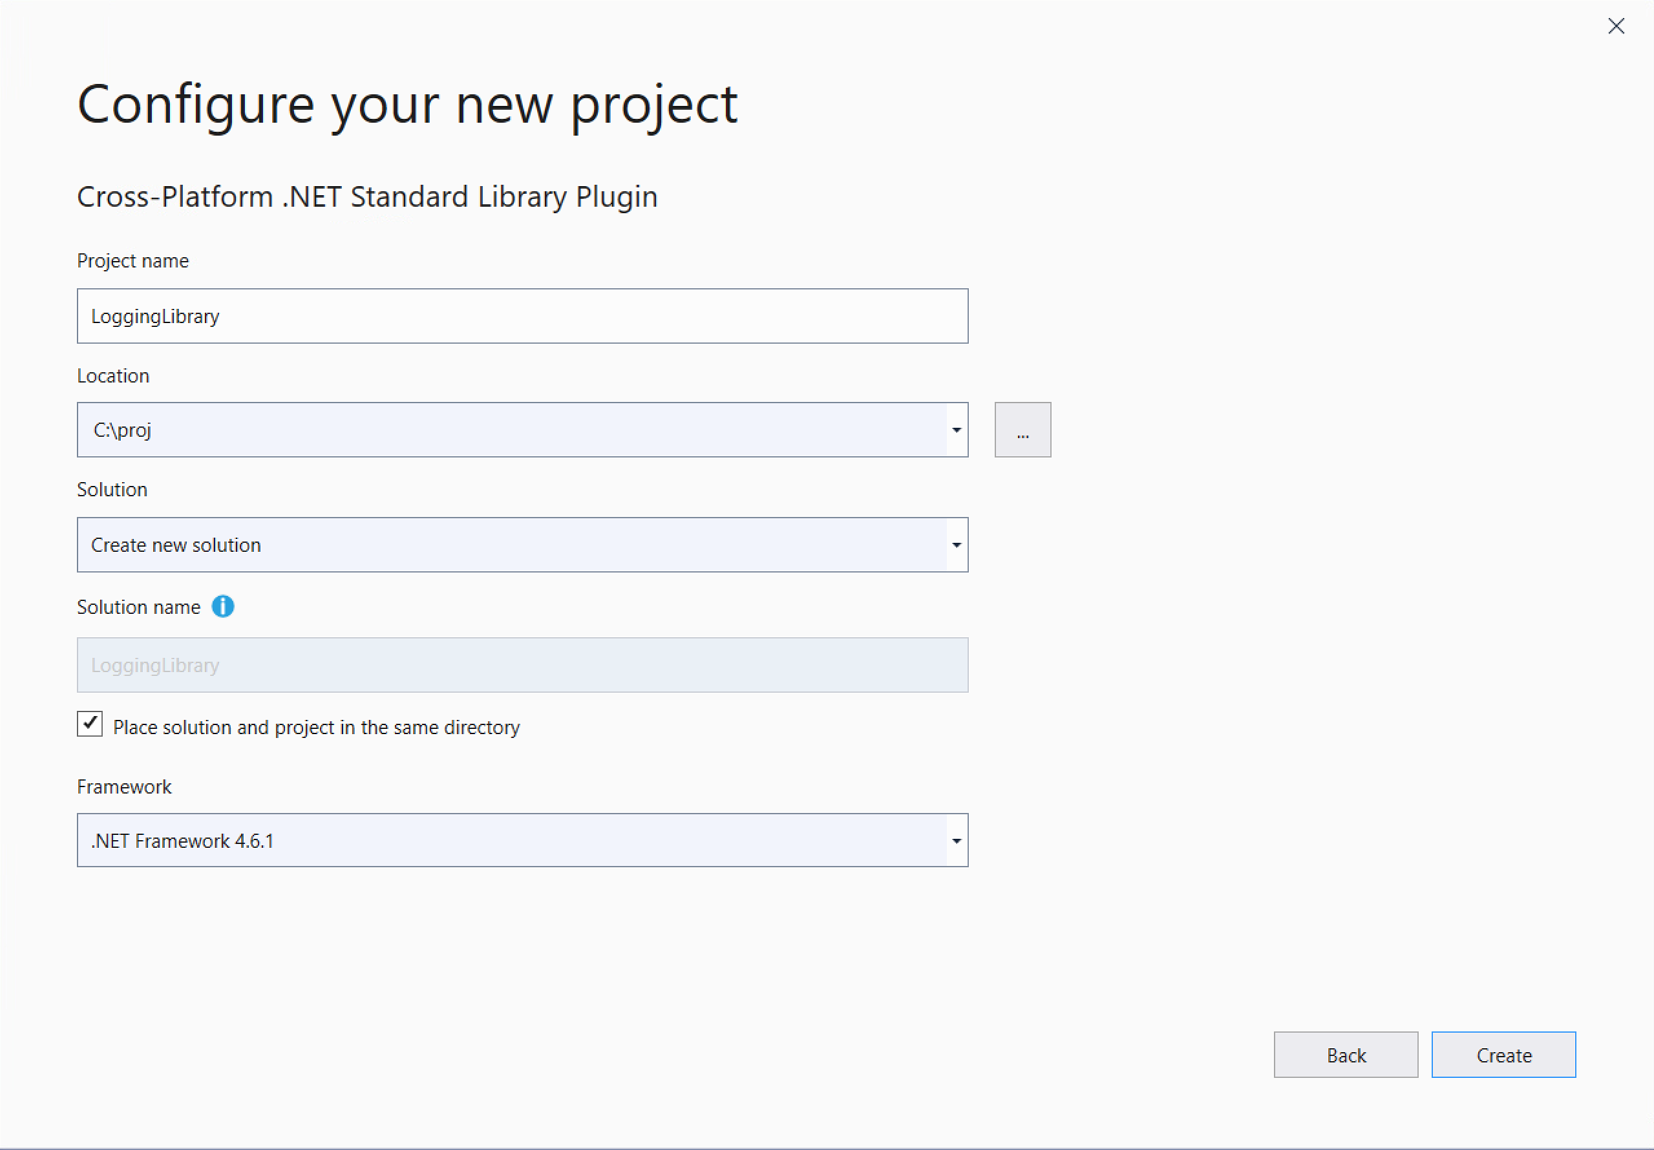
Change the name to LoggingLibrary, and click Create.
The resulting solution contains two Shared projects, along with a variety of platform-specific projects:
- The
ILoggingLibraryproject, which is contained in theILoggingLibrary.shared.csfile, defines the public interface (the API surface area) of the component. This is where you define the interface to your library. - The other Shared project contains code in
CrossLoggingLibrary.shared.csthat will locate a platform-specific implementation of the abstract interface at run time. You typically don't need to modify this file. - The platform-specific projects, such as
LoggingLibrary.android.cs, each contain a native implementation of the interface in their respectiveLoggingLibraryImplementation.cs(VS 2017) orLoggingLibrary.<PLATFORM>.cs(VS 2019) files. This is where you build out your library's code.
By default, the ILoggingLibrary.shared.cs file of the ILoggingLibrary project contains an interface definition, but no methods. For the purposes of this walkthrough, add a Log method as follows:
using System;
using System.Collections.Generic;
using System.Text;

namespace Plugin.LoggingLibrary
{
    /// <summary>
    /// Interface for LoggingLibrary
    /// </summary>
    public interface ILoggingLibrary
    {
        /// <summary>
        /// Log a message
        /// </summary>
        void Log(string text);
    }
}
Write your platform-specific code
To implement a platform-specific implementation of the ILoggingLibrary interface and its methods, do the following:
Open the
LoggingLibraryImplementation.cs(VS 2017) orLoggingLibrary.<PLATFORM>.cs(VS 2019) file of each platform project and add the necessary code. For example (using theAndroidplatform project):using System; using System.Collections.Generic; using System.Text; namespace Plugin.LoggingLibrary { /// <summary> /// Implementation for Feature /// </summary> public class LoggingLibraryImplementation : ILoggingLibrary { /// <summary> /// Log a message /// </summary> public void Log(string text) { throw new NotImplementedException("Called Log on Android"); } } }Repeat this implementation in the projects for each platform you want to support.
Right-click the solution and select Build Solution to check your work and produce the artifacts that you package next. If you get errors about missing references, right-click the solution, select Restore NuGet Packages to install dependencies, and rebuild.
Note
If you are using Visual Studio 2019, before selecting Restore NuGet Packages and trying to rebuild, you need to change the version of MSBuild.Sdk.Extras to 2.0.54 in LoggingLibrary.csproj. This file can only be accessed by first right-clicking the project (below the solution) and selecting Unload Project, after which you right-click on the unloaded project and select Edit LoggingLibrary.csproj.
Note
To build for iOS you need a networked Mac connected to Visual Studio as described on Introduction to Xamarin.iOS for Visual Studio. If you don't have a Mac available, clear the iOS project in the configuration manager (step 3 above).
Create and update the .nuspec file
Open a command prompt, navigate to the
LoggingLibraryfolder that's one level below where the.slnfile is, and run the NuGetspeccommand to create the initialPackage.nuspecfile:nuget specRename this file to
LoggingLibrary.nuspecand open it in an editor.Update the file to match the following, replacing YOUR_NAME with an appropriate value. The
<id>value, specifically, must be unique across nuget.org (see the naming conventions described in Creating a package). Also note that you must also update the author and description tags or you get an error during the packing step.<?xml version="1.0"?> <package > <metadata> <id>LoggingLibrary.YOUR_NAME</id> <version>1.0.0</version> <title>LoggingLibrary</title> <authors>YOUR_NAME</authors> <owners>YOUR_NAME</owners> <requireLicenseAcceptance>false</requireLicenseAcceptance> <description>Awesome application logging utility</description> <releaseNotes>First release</releaseNotes> <copyright>Copyright 2018</copyright> <tags>logger logging logs</tags> </metadata> </package>
Tip
You can suffix your package version with -alpha, -beta or -rc to mark your package as pre-release, check Pre-release versions for more information about pre-release versions.
Add reference assemblies
To include platform-specific reference assemblies, add the following to the <files> element of LoggingLibrary.nuspec as appropriate for your supported platforms:
<!-- Insert below <metadata> element -->
<files>
    <!-- Cross-platform reference assemblies -->
    <file src="Plugin.LoggingLibrary\bin\Release\Plugin.LoggingLibrary.dll" target="lib\netstandard1.4\Plugin.LoggingLibrary.dll" />
    <file src="Plugin.LoggingLibrary\bin\Release\Plugin.LoggingLibrary.xml" target="lib\netstandard1.4\Plugin.LoggingLibrary.xml" />
    <file src="Plugin.LoggingLibrary.Abstractions\bin\Release\Plugin.LoggingLibrary.Abstractions.dll" target="lib\netstandard1.4\Plugin.LoggingLibrary.Abstractions.dll" />
    <file src="Plugin.LoggingLibrary.Abstractions\bin\Release\Plugin.LoggingLibrary.Abstractions.xml" target="lib\netstandard1.4\Plugin.LoggingLibrary.Abstractions.xml" />

    <!-- iOS reference assemblies -->
    <file src="Plugin.LoggingLibrary.iOS\bin\Release\Plugin.LoggingLibrary.dll" target="lib\Xamarin.iOS10\Plugin.LoggingLibrary.dll" />
    <file src="Plugin.LoggingLibrary.iOS\bin\Release\Plugin.LoggingLibrary.xml" target="lib\Xamarin.iOS10\Plugin.LoggingLibrary.xml" />

    <!-- Android reference assemblies -->
    <file src="Plugin.LoggingLibrary.Android\bin\Release\Plugin.LoggingLibrary.dll" target="lib\MonoAndroid10\Plugin.LoggingLibrary.dll" />
    <file src="Plugin.LoggingLibrary.Android\bin\Release\Plugin.LoggingLibrary.xml" target="lib\MonoAndroid10\Plugin.LoggingLibrary.xml" />

    <!-- UWP reference assemblies -->
    <file src="Plugin.LoggingLibrary.UWP\bin\Release\Plugin.LoggingLibrary.dll" target="lib\UAP10\Plugin.LoggingLibrary.dll" />
    <file src="Plugin.LoggingLibrary.UWP\bin\Release\Plugin.LoggingLibrary.xml" target="lib\UAP10\Plugin.LoggingLibrary.xml" />
</files>
Note
To shorten the names of the DLL and XML files, right-click on any given project, select the Library tab, and change the assembly names.
Add dependencies
If you have specific dependencies for native implementations, use the <dependencies> element with <group> elements to specify them, for example:
<!-- Insert within the <metadata> element -->
<dependencies>
    <group targetFramework="MonoAndroid">
        <!--MonoAndroid dependencies go here-->
    </group>
    <group targetFramework="Xamarin.iOS10">
        <!--Xamarin.iOS10 dependencies go here-->
    </group>
    <group targetFramework="uap">
        <!--uap dependencies go here-->
    </group>
</dependencies>
For example, the following would set iTextSharp as a dependency for the UAP target:
<dependencies>
    <group targetFramework="uap">
        <dependency id="iTextSharp" version="5.5.9" />
    </group>
</dependencies>
Final .nuspec
Your final .nuspec file should now look like the following, where again YOUR_NAME should be replaced with an appropriate value:
<?xml version="1.0"?>
<package >
    <metadata>
    <id>LoggingLibrary.YOUR_NAME</id>
    <version>1.0.0</version>
    <title>LoggingLibrary</title>
    <authors>YOUR_NAME</authors>
    <owners>YOUR_NAME</owners>
    <requireLicenseAcceptance>false</requireLicenseAcceptance>
    <description>Awesome application logging utility</description>
    <releaseNotes>First release</releaseNotes>
    <copyright>Copyright 2018</copyright>
    <tags>logger logging logs</tags>
        <dependencies>
        <group targetFramework="MonoAndroid">
            <!--MonoAndroid dependencies go here-->
        </group>
        <group targetFramework="Xamarin.iOS10">
            <!--Xamarin.iOS10 dependencies go here-->
        </group>
        <group targetFramework="uap">
            <dependency id="iTextSharp" version="5.5.9" />
        </group>
    </dependencies>
    </metadata>
    <files>
        <!-- Cross-platform reference assemblies -->
        <file src="Plugin.LoggingLibrary\bin\Release\Plugin.LoggingLibrary.dll" target="lib\netstandard1.4\Plugin.LoggingLibrary.dll" />
        <file src="Plugin.LoggingLibrary\bin\Release\Plugin.LoggingLibrary.xml" target="lib\netstandard1.4\Plugin.LoggingLibrary.xml" />
        <file src="Plugin.LoggingLibrary.Abstractions\bin\Release\Plugin.LoggingLibrary.Abstractions.dll" target="lib\netstandard1.4\Plugin.LoggingLibrary.Abstractions.dll" />
        <file src="Plugin.LoggingLibrary.Abstractions\bin\Release\Plugin.LoggingLibrary.Abstractions.xml" target="lib\netstandard1.4\Plugin.LoggingLibrary.Abstractions.xml" />

        <!-- iOS reference assemblies -->
        <file src="Plugin.LoggingLibrary.iOS\bin\Release\Plugin.LoggingLibrary.dll" target="lib\Xamarin.iOS10\Plugin.LoggingLibrary.dll" />
        <file src="Plugin.LoggingLibrary.iOS\bin\Release\Plugin.LoggingLibrary.xml" target="lib\Xamarin.iOS10\Plugin.LoggingLibrary.xml" />

        <!-- Android reference assemblies -->
        <file src="Plugin.LoggingLibrary.Android\bin\Release\Plugin.LoggingLibrary.dll" target="lib\MonoAndroid10\Plugin.LoggingLibrary.dll" />
        <file src="Plugin.LoggingLibrary.Android\bin\Release\Plugin.LoggingLibrary.xml" target="lib\MonoAndroid10\Plugin.LoggingLibrary.xml" />

        <!-- UWP reference assemblies -->
        <file src="Plugin.LoggingLibrary.UWP\bin\Release\Plugin.LoggingLibrary.dll" target="lib\UAP10\Plugin.LoggingLibrary.dll" />
        <file src="Plugin.LoggingLibrary.UWP\bin\Release\Plugin.LoggingLibrary.xml" target="lib\UAP10\Plugin.LoggingLibrary.xml" />
    </files>
</package>
Package the component
With the completed .nuspec referencing all the files you need to include in the package, you're ready to run the pack command:
nuget pack LoggingLibrary.nuspec
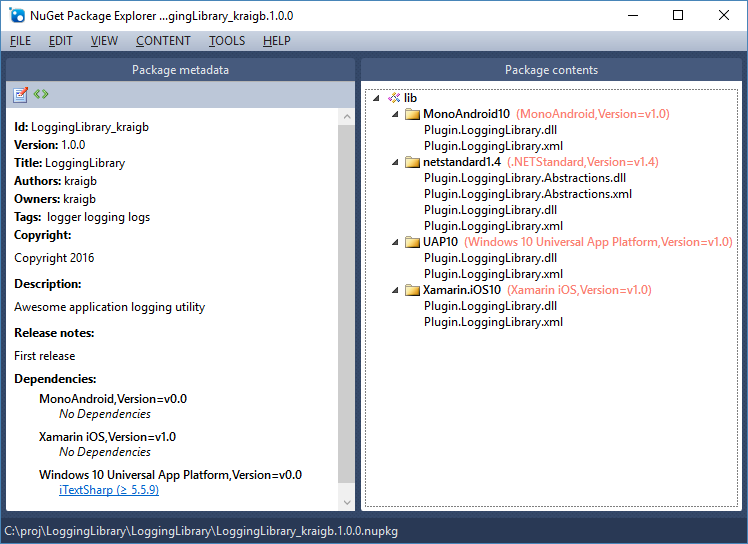
This will generate LoggingLibrary.YOUR_NAME.1.0.0.nupkg. Opening this file in a tool like the NuGet Package Explorer and expanding all the nodes, you see the following contents:
Tip
A .nupkg file is just a ZIP file with a different extension. You can also examine package contents, then, by changing .nupkg to .zip, but remember to restore the extension before uploading a package to nuget.org.
To make your package available to other developers, follow the instructions on Publish a package.
Related topics
Feedback
Coming soon: Throughout 2024 we will be phasing out GitHub Issues as the feedback mechanism for content and replacing it with a new feedback system. For more information see: https://aka.ms/ContentUserFeedback.
Submit and view feedback for